


This post may contain affiliate links. See my disclosure at the bottom of the page for more information.
Decoration Obsession
I admit, I have been known to stay up decorating these cookies until well after midnight. As easy as the icing is to make, once you’ve made it and made a variety of colors and you’re on a decorating roll, it’s hard to step away. The icing will dry out, which is good because it will dry on your cookies! But you may need to “re-wet” it a bit as you work IF you take forever to decorate like me. I don’t go to quite the length that some people do, if you look up the hashtag #ChristmasCookies on IG you’ll see some pro designs that would take me a week to make… each! Those super fancy designs also require a much firmer icing, like Royal Icing, which tends to get hard and crunchy and doesn’t always taste as good as it looks. I don’t like a crunchy icing, so this recipe is for a softer version that tastes good AND looks good, it just doesn’t give you as much structure and detail control.
Tips and Tricks
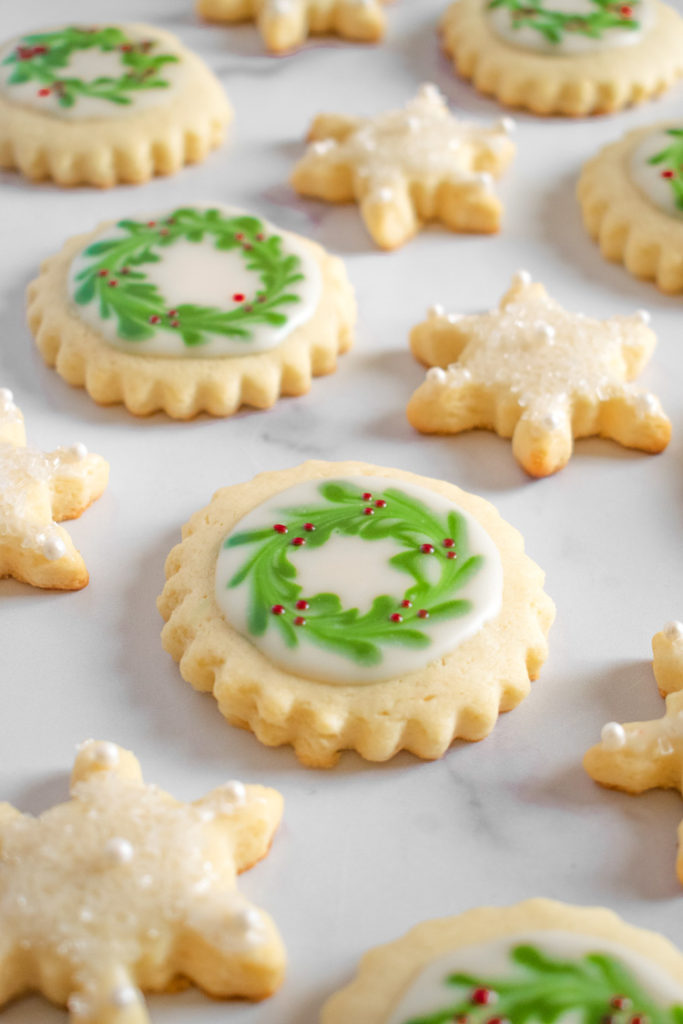
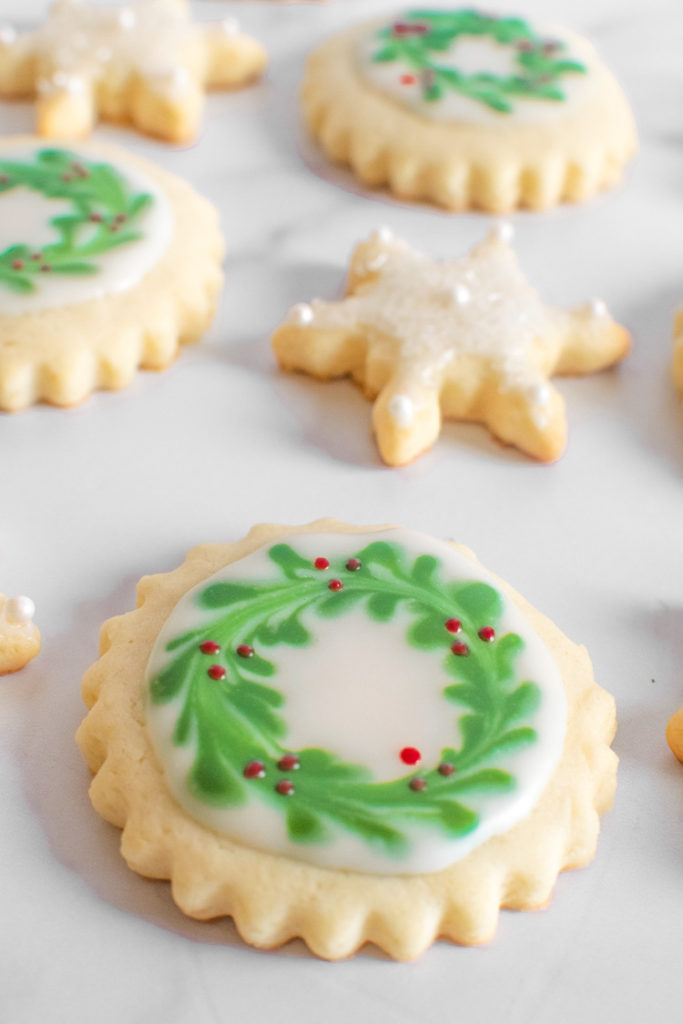
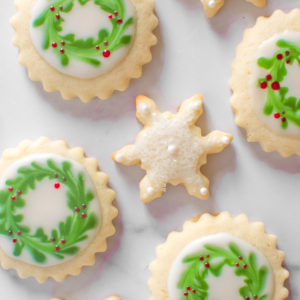
I divide my icing into a variety of small ramekins, then use these food coloring gels to color them (a very VERY little color goes a LONG way!). I have a cookie cutter set like this with a variety of sizes; I like having some bigger and some smaller to choose from. I use food-safe paintbrushes like these to paint my icing on each cookie, and add sprinkles or sparkling sugar as needed. This is a good starter set of Christmas sprinkles if you need it. As shown in the photos, you’ll see my favorite “easy” decoration to do if I’m doing lots of cookies, is to use a round fluted cutter like one of these which I use as a wreath (this also doubles as a biscuit cutter). I paint on a round disc of white icing, leaving a 1/4″ border so the icing doesn’t slide off the edge. Before the icing has set (so I have to do one at a time) I use the tip of a paintbrush (or an icing bottle) to “dab and drag” a star shape (as many points as you want). If there’s room, I’ll make a second star whose points alternate with the first. Then I take something small and pointy (like the back end of a fine paintbrush handle) and drag a circle through the intersections of the stars to swirl the wreath (I will post a video of this on Instagram in the story highlights). Once the icing has dried a bit, I will dab on tiny red drops for berries. Note: I say these are “easy” but it takes a few cookies to get the hang of this! Then just give them a good long time for the icing to set (it will depend on how thick you’ve put it on) and keep wax paper between layered cookies so they don’t stick together and ruin your designs.
Flavor Craze
One of the great things about this recipe is it’s rather easy to keep the basic cookie recipe and adjust the flavors to your preference. Brad likes them to have a strong vanilla flavor, so I use two kinds of vanilla, including natural vanilla extract AND clear vanilla, which you can get on Amazon if you can’t find it in your local store (I also use this in my Funfetti “Birthday” Cookie recipe). I have also made these Christmas cookies with a combination of almond extract and orange zest, as well as almond extract with lemon zest. If you wanted to experiment with other flavored extract-or-zest combos you could, I would just recommend making a smaller batch of dough to test so if you end up not liking the flavor, you won’t have wasted a huge batch of dough.
Grandma's Christmas Cookies
Equipment
- Cookie cutters
Ingredients
Cookies
- 1 cup unsalted butter, softened to room temperature
- 1/2 cup sour cream, at room temperature
- 1 cup granulated (white) sugar
- 1 large egg, at room temperature
- 1 teaspoon vanilla extract
- 2 teaspoons clear vanilla
- 3-1/2 cups all-purpose flour
- 1-1/2 teaspoons baking powder
- 3/4 teaspoon salt
Icing
- 1.5 cups powdered sugar
- 1/2 teaspoon vanilla extract
- 1/2 teaspoon clear vanilla
- 1 teaspoon light corn syrup
- 1-1/2 to 2 tablespoons water, at room temperature
- Pinch of salt
Instructions
- Combine the softened butter and sour cream in the bowl of a stand mixer (or a large bowl if mixing by hand). Pour in the sugar and cream them together, beating for several minutes at medium speed until light and fluffy. Add the egg and the two vanillas and mix well.
- In a separate medium bowl, combine the flour, baking powder and salt. With the mixer on low, gradually pour the flour mixture into the butter mixture until it is well-combined and results in a soft dough.
- Divide the dough into two balls, then flatten them to about 1-inch thick discs and refrigerate them, wrapped in plastic wrap, for at least one hour or up to three days.
- When you're ready to bake, preheat the oven to 350 degrees Fahrenheit.
- Take the first disc and roll it out to your desired thickness, ideally between sheets of parchment paper which will prevent the dough sticking to your rolling pin or counter. I also prefer a slightly thicker cookie, so I'd recommend around 1/4-inch thick dough (which will rise a bit further during baking).
- Cut out cookies into your desired shape(s) and place them about 1-inch apart on a parchment-lined cookie sheet. Then pop them back in the fridge for about 10 minutes before placing in the oven.
- Bake for 8-12 minutes, depending on the size and thickness of your cookies. Keep a close eye, when you start to see a tiny golden edge at the bottom, remove from the oven and place on a cooling rack. After five minutes, transfer the cookies to the cooling rack directly.
- Make sure your cookies are completely cooled before you decorate them, as the icing will melt off the top otherwise. Store in an airtight container, with wax or parchment paper between layers IF cookies are iced, cookies without icing can be stacked directly on top of each other.
Icing
- To make the icing, simply combine all the ingredients in a small bowl and mix with small whisk or a fork. You may need to add more water (or more powdered sugar) to achieve your desired consistency. As you decorate the icing may start to dry out, but just add a few drops of water and stir to revive it. Divide and add colors as you wish. Have fun and enjoy!
Disclosure: if you know me at all, or have read enough of this website to appreciate that honesty is always my policy, you know that I am here to spread the word about things that I love: food, products, charity organizations, etc. Occasionally, through something called “affiliate links” (links to products on Amazon, specifically) there is a chance I may earn a small commission, at NO additional cost to you. But I am legally required to tell you that as an Amazon Associate, I earn from qualifying purchases. Whether an item earns me a commission has NO IMPACT on my decision to list it, and if the item is on a site for which I earn zero commission (i.e., any site OTHER than Amazon) I will still link to it! It would go against everything I stand for to profit off of misusing your trust. I only recommend products I actually use myself (or occasionally link to other products as examples or points of comparison), and all opinions expressed here are entirely my own.