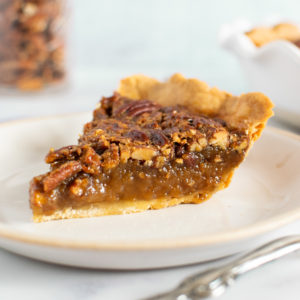
The Best Pecan Pie
A tried-and-true classic pecan pie recipe that has been a favorite in our household for many years. (Please note the time stated is for the pie filling and bake time, not homemade crust prep and resting time. The crust will take approximately 15 minutes to make and needs 2 hours to rest in the fridge. You can also make it up to 5 days ahead of time and keep it refrigerated until you're ready to use.)
Ingredients
Pecan Pie Filling
- 1 stick unsalted butter
- 1/2 cup brown sugar
- 1/2 cup granulated (white) sugar
- 1/2 cup light corn syrup
- 1/2 cup dark corn syrup
- 3 room-temperature eggs, beaten (you can place the eggs in a bowl of warm water to expedite the process of bringing them to room temperature)
- 1 cup pecan pie pieces, broken by hand into quarters (plus 8 nice halves for decoration on top)
- 1 unbaked pie crust (store bought or homemade, recipe to follow)
Homemade Butter Crust (optional, makes two crusts)
- 2-1/2 cups all-purpose flour
- 1-1/2 tsp salt
- 8 tbsp unsalted butter, cold and cut into small cubes
- 8 tbsp vegetable shortening, chilled
- 1/2 cup ice water
Instructions
Pecan Pie Filling
- *If making the crust from scratch, please read instructions below first.
- 1. Preheat oven to 350 degrees.
- 2. IF using a premade refrigerated crust, roll it out and lay it in a buttered (or sprayed, I like to use Pam for Baking) pie plate. Then put the plate and crust back in the fridge until it's ready to be filled.
- 3. In a medium saucepan, melt the butter but do not let it brown.
- 4. Add the two sugars and two corn syrups and stir with a wooden spoon over medium heat until the sugar has dissolved, about 5 minutes. When you hold the wooden spoon vertically and tap it on the bottom of the pan, you don't want to feel the crunch of the sugar. It's okay if you leave it for a moment and it bubbles a bit around the edge of the saucepan, but you'll want to stir the mix for the majority of those five minutes.
- 5. When the sugars have melted, remove the saucepan from the stove and set it somewhere to cool for about 15 minutes, stirring occasionally to help release the heat. This is SUPER important, as adding the eggs immediately to this mixture will cause them to scramble!
- 6. While your sugar mixture is cooling, prepare the pecans. I like to buy pecan halves so I can set aside 8 to decorate the top. I break each pecan by hand, splitting it into quarters (see instructional video in my Instagram pecan pie story highlight), setting aside the 8 "nicest" halves as I go. It is fast and easy to do, and you only need one cup of pecan pieces. If you prefer smaller pieces you can of course chop or prepare your pecans however you like.
- 7. When the sugar mixture has cooled, pour in your three room-temperature beaten eggs and combine quickly. Then add the chopped pecans.
- 8. Remove your pie crust from the fridge and pour your filling in. Take the 8 pecan halves that you set aside and place one near the crust edge for each slice. I find it easiest to place two across from each other, creating a cross first, then filling in the remaining four on the diagonals.
- 9. Bake for approximately one hour or until your center is set. That doesn't mean it's hard, the middle may be puffed up and jiggle a bit, but it should jiggle as a whole, not move like it's still wet and sloshy. The center will fall and set as it cools, it will not stay puffy.
- 10. Set on a wire rack until pie is cooled. Pie can be made up to two days in advance and kept, covered tightly, in the refrigerator. Bring to room temperature before serving. Top with whipped cream or vanilla ice cream if you like!
Homemade Butter Crust (optional, makes 2 crusts)
- 1. If you are making your crust from scratch, prepare it first as it will need to rest in the fridge for around two hours before use.
- 2. Mix the flour and salt together in a large bowl or in the bowl of a food processor. Add the butter cubes and shortening. Using a pastry cutter, two forks or your food processor in pulses, cut the butter and shortening into the mixture until it resembles a coarse meal. It's okay if there are still some pea-sized lumps in there.
- 3. Add a few ice cubes to your 1/2 cup of water and mix them around, allowing the water to chill. After a moment or two, remove the ice cubes and re-measure your 1/2 cup (as some of the water will have melted from the cubes).
- 4. If using a food processor, pulse your dough while adding the cold water, in a slow drizzle or a tablespoon at a time. If making by hand, use a wooden spoon to mix in the water one tablespoon at a time until the dough forms large clumps. It should stick together well but not feel "wet." If you need to add a little more than 1/2 cup of water that's fine too, just do so in small increments.
- 5. Transfer the dough to a floured surface and work it into a ball, ensuring the flour is incorporated. It should not feel sticky (if it does, add a little more flour and work it into the dough).
- 5. Divide the dough in half and form each half into a ball, then flatten into a thick disc. Wrap each disk in plastic wrap.
- 6. Refrigerate the dough for at least two hours, or up to five days, until you are ready to use. If you don't need the second crust, freeze it (wrapped tightly in plastic wrap for up to three months) and thaw overnight in the fridge before using.
- 7. Using a rolling pin, take a disc and roll it out from the center to the edges, rotating it as you go. Because I tend to roll out and rotate on a cutting board, I like to flip my dough after every few passes of the rolling pin, in order to prevent it from sticking. You can also do this by lifting and turning the dough with your hands. Keep rolling until the dough fits comfortably in your pie plate. Keep in mind your crust edge will likely shrink down a bit as it bakes.
- 8. Butter or spray your pie plate with a nonstick cooking spray (I like Pam for Baking). Lay your rolled out crust in the pan, and crimp or style your edge however you like. Put your pie plate and crust back into the fridge until it's ready to be filled. If you don't need the second crust just yet, wrap tightly and freeze for up tp three months.
Tried this recipe?Let us know how it was!